
GS Tech Info
GS Tech Info
NOTE: There are a few but true information is available.
Let's dive in it
In Next.js, Middleware is a function that runs before a request is completed or reachs the origin server - where your API route (server logic gets excute), allowing you to inspect, modify, and handle the request before it reaches a page or an API route.
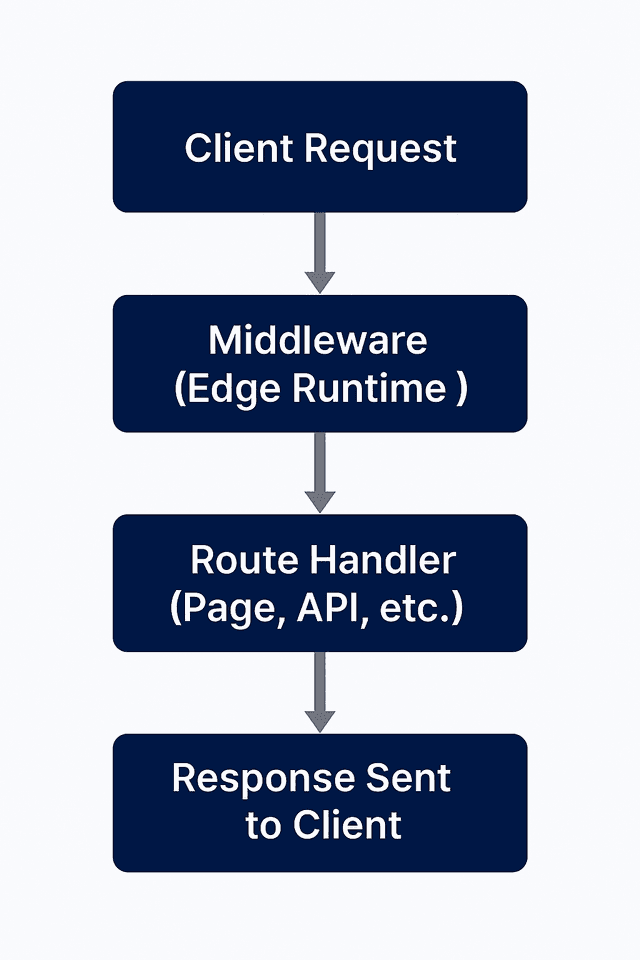
1Step 1: Client makes a request.
2	User sends a request to your application (e.g., to /dashboard).
3Step 2: Middleware runs at the edge before your app code.
4	This is where you can inspect the request, check cookies, read headers, or decide whether to rewrite/redirect it.
5	(where your Middleware function runs.)
6Step 3: Middleware can either:
7	Pass the request along unchanged to your app, or
8	Redirect/Rewrite it to a different route, or
9	Return a custom response entirely.
10
11The final response is sent back to the user.This is where people often get confused because all four (Middleware, API routes, getServerSideProps, Server Components) touch the request–response pipeline but at different stages and with different capabilities. (Middleware, API routes, getServerSideProps, and Server Components all serve different purposes in Next.js)
Middleware
1When it runs:
2	Before a request reaches your app’s logic.
3
4Runtime:
5	Edge Runtime (Web APIs, no Node.js APIs).
6
7Capabilities:
8	Inspect & modify request headers, cookies, URL.
9	Redirect or rewrite requests before they hit the route.
10	Run globally across multiple routes.
11
12Limitations:
13	No access to request body (e.g., JSON form POST).
14	No heavy computation (size limits + must be fast).
15
16Best for: Auth checks, A/B testing, geo-based routing, localization, IP blocking, lightweight security.
API Routes
1When it runs:
2	When you hit an endpoint like /api/user.
3
4Runtime:
5	Node.js server (or Edge if explicitly configured).
6
7Capabilities:
8	Full access to request + response body.
9	Can connect to databases, run heavy logic, perform CRUD operations.
10	Great for server-side business logic.
11
12Limitations:
13	Adds latency (round trip to server).
14	Scoped only to API endpoints (not global).
15
16Best for: REST/GraphQL APIs, handling POST/PUT/DELETE requests, data fetching from client.
getServerSideProps
1When it runs:
2	At request time during page rendering.
3
4Runtime:
5	Node.js server.
6
7Capabilities:
8	Fetch data securely (DB calls, APIs).
9	Pass props directly to a React page.
10
11Limitations:
12	Runs on every page request, so it can be slower.
13	Only works in the Pages Router (deprecated in App Router).
14
15Best for: Preloading data for a page before rendering, especially when SEO matters.
16(In App Router, getServerSideProps is replaced by Server Components + fetch())
Server Components (App Router)
1When it runs:
2	At render time when React renders your tree.
3
4Runtime:
5	Node.js (or Edge if configured).
6
7Capabilities:
8	Fetch data directly in the component using async/await.
9	Run heavy logic without shipping JS to client.
10
11Composable — works inside your React tree.
12
13Limitations:
14	Runs per render, not globally.
15	Can’t intercept requests like Middleware does.
16
17Best for: Data-fetching and rendering UI in the App Router.
Comparison Table:
| Feature / Aspect | Middleware | API Routes | getServerSideProps | Server Components |
|---|---|---|---|---|
| Purpose | Intercept & modify requests early | Handle backend logic (CRUD, etc.) | Fetch data for SSR | Render UI on the server |
| Runs When | Before routing | On request to /api/* | On page request | During rendering of a page/component |
| Runtime | Edge (fast, limited) | Node.js (full access) | Node.js | Node.js or Edge |
| Access to Request Body | No | Yes | Yes | No |
| Access to Headers/Cookies | Yes | Yes | Yes | Yes |
| Can Redirect | Yes (NextResponse) | Yes (manually via response) | Yes (redirect in props) | No (handled outside) |
| Can Modify Response | Yes (headers, rewrites) | Yes | Yes | Yes (HTML output) |
| Use Case Examples | Auth, geo-routing, A/B testing | Form handling, DB queries, APIs | Dynamic SSR pages | UI logic with server-side data |
| Performance | Very fast (runs at edge) | Slower (server-side) | Slower (server-side) | Fast (streamed, no client JS) |
The edge runtime is a lightweigt, secure, and globally distributed Javascript execution environment, specially designed to run the code close to the user - at CDN edge location - rather then on centralized server.
In other words..
It is a lightweight execution environment that runs your code geographically close to the user - at the "edge" of the network - rather then the centralized server. which has ?signeficantly lower latency as comparied to any centralized server.
Example:
If a user in India visits a website such as example.com, and the main server of the site is located in US. Then all server based calculation is excuted in this main server (which is located in US) expect the Middleware. Middleware excutes at edge runtime, it means middleware for the user whoes geographical location is in India, runs the Middleware in the server of India (very close to user - edge of the network), and after middleware excution it pass the request to the main origin server (in US).
Key Characteristics
| Aspect | Edge Runtime | Node.js Runtime |
|---|---|---|
| Location | Runs on CDN/edge locations worldwide | Runs in centralized server environment |
| APIs available | Limited to Web APIs (e.g., fetch, Request, Response, crypto.subtle) | Full Node.js APIs (fs, net, http, process access, etc.) |
| Startup time | Near-instant (no cold start) | Higher cold start time |
| Use cases | Lightweight request interception, personalization, redirects, caching, auth checks | Heavy logic, DB queries, file system access, business logic |
| Code limits | Strict (around 1 MB compressed bundle) | Larger (tens of MBs) |
| Persistence | Stateless, no file system, no long-running connections | Can hold connections, run background jobs |
| Execution Model | Isolated, event-driven | Full-featured, long-lived processes |
| Latency | Low (closer to user) | Higher (depends on server location) |
| Memory & CPU | Limited | More powerful |
Middleware is often faster than SSR because it runs on the edge - close to users, with near-zero cold starts. It executes before caching and routing, enabling instant redirects, auth checks, and request shaping without spinning up full rendering. SSR is heavier, centralized, and slower for these quick tasks.
Simplified explanation:
Execution Location:
Middleware (Edge Runtime):
Runs at globally distributed edge servers (Vercel’s Edge Network / PoPs). → Closer to the user = less round-trip time (RTT).
SSR (Node.js Runtime):
Runs in a centralized server or serverless function, often in a single region (e.g., AWS us-east-1). → Users far from that region face higher latency.
Startup Time (Cold Starts):
Middleware:
Runs in V8 isolates (lightweight, like WebAssembly). → Near-instant execution (cold starts <10ms).
SSR:
Runs in a full Node.js environment. → Cold starts can take 200–500ms, especially on serverless platforms.
Work Done Before Rendering:
Middleware:
Runs before caching and routing, so it can make instant decisions (redirects, rewrites, auth checks) without hitting your origin. → Example: If a request doesn’t have an auth token, Middleware can block it immediately instead of booting up SSR.
SSR:
Has to spin up rendering logic, fetch data, and generate HTML — even if the request could have been rejected earlier.
Caching Integration:
Middleware:
Works seamlessly with the CDN. It can shape requests and still serve cached content (super fast).
SSR:
Typically bypasses cache for dynamic responses, making every request heavier.
No HTML Rendering
Simple Analogy Middleware = traffic cop at every street corner → stops or redirects cars instantly, close to where they are. SSR = central office downtown → every car must drive all the way there, even if it only needed a quick check.
In short:
Middleware is faster than traditional SSR because it’s lightweight, globally distributed, and runs before caching. SSR is more powerful (full Node.js + rendering), but slower due to centralized execution and heavier workloads.
File Name & Location
The middleware file must be named exactly:
middleware.ts (TypeScript)
middleware.js (JavaScript)
Place it in the root of your project (same level as pages/ or app/).
		my-app/
		├─ app/               # App Router
		├─ pages/             # Pages Router
		├─ public/
		├─ middleware.ts      # Middleware lives here
		└─ next.config.js
You cannot put it inside pages/ or app/ — Next.js won’t detect it there.
Basic Example
1// middleware.ts
2
3import { NextResponse } from 'next/server'
4import type { NextRequest } from 'next/server'
5export function middleware(request: NextRequest) {
6	// Example: Block access to /dashboard if not logged in
7	const isLoggedIn = request.cookies.get('token')?.value
8	if (!isLoggedIn && request.nextUrl.pathname.startsWith('/dashboard')) {
9		return NextResponse.redirect(new URL('/login', request.url))
10	}
11	// Allow request to continue
12	return NextResponse.next()
13}
Controlling Which Routes Middleware Runs On:
By default, Middleware runs on all routes.
You can scope it with the matcher config:
1// Only run on /dashboard and /profile
2export const config = {
3	matcher: ['/dashboard/:path*', '/profile/:path*'],
4}
What Does matcher Do?
1'/dashboard/:path*' matches:
2	/dashboard
3	/dashboard/settings
4	/dashboard/profile/edit
5[Same for /profile]
Naming Conventions Recap
| Rule | Description |
|---|---|
| File name | Must be middleware.ts or middleware.js (another file name is not allowed such as _middleware.ts or _middleware.js or middlewares.ts or middlewares.js etc.) |
| Location | Must be in the root directory of your project |
| No nested middleware | You cannot place middeware inside app/, pages/, or any other subfolder (middleware is must on root directory). |
| Single middleware file | Only one middleware file is allowed per project (if you need multiple middewares, you must combine them inside the single file or import helper functions). |
In short:
By default, Middleware runs on every request. To restrict it, you export a config object with a matcher property from your middleware.ts file.
Basic Syntax:
1// middleware.ts
2import { NextResponse } from 'next/server'
3import type { NextRequest } from 'next/server'
4
5export function middleware(request: NextRequest) {
6    return NextResponse.next()
7}
8
9export const config = {
10  matcher: ['/dashboard/:path*', '/profile/:path*'], // only these routes
11}
Matcher syntax
| Pattern | Matches.. |
|---|---|
| /about | Only /about |
| /dashboard/:path* | /dashboard, /dashboard/settings, etc. |
| /api/:function* | Any API route under /api |
| /:locale(en | fr)/:path* |
| /((?!api | _next/static |
Next.js automatically excludes the following from Middleware:
If you write your own regex matcher, you must account for these exclusions manually.
Execution Order with Multiple Matchers
In Next.js, you can only have one middleware.ts file, but you can define multiple matcher patterns inside its config. Matchers are evaluated independently. If a request path matches any of them, Middleware runs once for that request. The order of matchers in the array does not define priority or sequencing. Think of them as OR conditions. Inside the Middleware function, you can branch logic based on the request path (or other conditions).
Example 1
1export const config = {
2    matcher: [
3        '/dashboard/:path*',
4        '/profile/:path*',
5        '/admin/:path*',
6        '/((?!api|_next|favicon.ico).*)',
7    ],
8}
Explanation:
Example 2
1export const config = {
2    matcher: ["/((?!_next/static|favicon.ico).)", "/admin/:path"],
3}
Explanation:
In summary:
The NextResponse object is the powerhouse of control inside Next.js middleware. It’s what you use to respond to, redirect, rewrite, or modify an incoming request before it reaches your route handler.
It is a utility provided by Next.js that lets you:
It’s part of the next/server module and is designed to work within the Edge Runtime.
Why do we need it?
Since Middleware runs before the request reaches your route handler or page, NextResponse acts as your “traffic controller.” It controls whether the request:
How can it be used to: redirect requests, rewrite URLs, and set custom headers?
Redirect Requests
Use NextResponse.redirect() to send users to a different URL. Perfect for auth guards, onboarding flows, or geo-based redirects.
1import { NextResponse } from 'next/server'
2import type { NextRequest } from 'next/server'
3export function middleware(req: NextRequest) {
4const isLoggedIn = req.cookies.get('token')?value
5	if (!isLoggedIn && req.nextUrl.pathname.startsWith('/dashboard')) {
6		return NextResponse.redirect(new URL('/login', req.url))
7	}
8	return NextResponse.next()
9}
Rewrite URLs
Use NextResponse.rewrite() to internally reroute a request without changing the URL in the browser. Great for A/B testing, feature flags, or serving content from a different path.
Set Custom Headers
Use NextResponse.next() and then modify the response headers. Useful for security headers, caching, or passing metadata downstream.
1export function middleware(req: NextRequest) {
2	const response = NextResponse.next()
3	response.headers.set('x-gs-powered-by', 'Next.js Middleware')
4	response.headers.set('x-feature-flag', 'beta-dashboard')
5	return response
6}
You can also read headers from the request:
1const userAgent = req.headers.get('user-agent')Combine All Three
You can mix and match these in a single middleware flow:
1export function middleware(req: NextRequest) {
2	if (req.nextUrl.pathname === '/old-route') {
3		return NextResponse.redirect(new URL('/new-route', req.url))
4	}
5	if (req.nextUrl.pathname === '/preview') {
6		return NextResponse.rewrite(new URL('/preview/index.html', req.url))
7	}
8	const response = NextResponse.next()
9	response.headers.set('x-gs-debug', 'active')
10	return response
11}
Common Methods
| Method | Purpose | Example |
|---|---|---|
| NextResponse.next() | Allows the request to continue normally | return NextResponse.next() |
| NextResponse.redirect() | Redirects to a different URL | return NextResponse.redirect(new URL('/login', request.url)) |
| NextResponse.rewrite() | Internally rewrites the request path (URL in browser doesn’t change) | return NextResponse.rewrite(new URL('/new', request.url)) |
| response.headers.set() | Sets custom headers on the response | response.headers.set('X-Auth', 'true') |
| response.headers.append() | Appends a value to an existing header | response.headers.append('Set-Cookie', 'theme=dark') |
| response.cookies.set() | Sets cookies on the response | response.cookies.set('user', 'GS') |
| response.cookies.delete() | Deletes a cookie from the response | response.cookies.delete('user') |
| response.cookies.get() | Reads a specific cookie | const user = response.cookies.get('user') |
| NextResponse.json() | Returns a JSON response (useful in middleware APIs) | return NextResponse.json({ error: 'Unauthorized' }, { status: 401 }) |
| NextResponse.redirect(URL, status?) | Redirect with status (default 307) | return NextResponse.redirect(new URL('/', request.url), 308) |
| NextResponse.error() | Returns a generic error response (500) | return NextResponse.error() |
Why It Matters
NextResponse.redirect() and NextResponse.rewrite() both change where the request resolves, but they work differently — redirect() sends the user to a new URL (browser address bar changes), while rewrite() serves different content at the same URL (browser address bar stays the same).
NextResponse.redirect()
Example:
1import { NextResponse } from "next/server";
2export function middleware(req) {
3	const isLoggedIn = false;
4	if (!isLoggedIn) {
5		return NextResponse.redirect(new URL("/login", req.url));
6	}
7	return NextResponse.next();
8}
If a user visits /dashboard, they get redirected to /login, and the browser shows /login.
NextResponse.rewrite()
Example:
1import { NextResponse } from "next/server";
2export function middleware(req) {
3	const url = req.nextUrl;
4	if (url.pathname === "/about") {
5		return NextResponse.rewrite(new URL("/info", req.url));
6	}
7	return NextResponse.next();
8}
If a user visits /about, they see the content from /info, but the browser still shows /about.
Comparision Table
| Feature | redirect() | rewrite() |
|---|---|---|
| User-visible URL change | Yes — browser URL changes | No — browser URL stays the same |
| Client round-trip | Yes — triggers a full client-side redirect | No — handled internally at the edge |
| Use case | Auth redirects, onboarding flows, external links | Localization, A/B testing, internal routing |
| Performance Impact | Slightly higher — involves network round-trip | Lower — stays within edge runtime |
| SEO implications | Can affect crawl/indexing | Transparent to crawlers — no redirect status code |
Key Difference
In Next.js Middleware, you use the cookies API available on the NextRequest and NextResponse objects.
Read Cookies
1import { NextResponse } from "next/server";
2import type { NextRequest } from "next/server";
3export function middleware(req: NextRequest) {
4	// Reading cookies from the request
5	const token = req.cookies.get("token")?.value;
6	if (!token) {
7		// If no token, redirect to login
8		return NextResponse.redirect(new URL("/login", req.url));
9	}
10
11	return NextResponse.next();
12}
Set Cookies
1import { NextResponse } from "next/server";
2import type { NextRequest } from "next/server";
3export function middleware(req: NextRequest) {
4	const res = NextResponse.next();
5	// Set a cookie
6	res.cookies.set("user", "GS", {
7		httpOnly: true,
8		secure: true,
9		path: "/",
10		sameSite: "strict",
11	});
12	return res;
13}
You can also delete cookies: res.cookies.delete("token");
Cookies are great for auth tokens, user preferences, A/B testing buckets, and session hints — but remember, you can’t access the request body in middleware, so cookies are your best bet for lightweight state.
2. Modifying Request & Response Headers
In Next.js, cookies are primarily accessed through the request headers, but you can also read and write cookies in the response—especially in middleware, route handlers, and server actions.
You can add, remove, or update headers on the request or response for analytics, caching, or security.
Adding Custom Headers (Analytics / Debugging)
1export function middleware(req: NextRequest) {
2	const res = NextResponse.next();
3	// Example: custom analytics header
4	response.headers.set('X-Request-ID', crypto.randomUUID());
5	response.headers.set('X-Geo-Region', request.geo?.region || 'unknown');
6return res;
7}
Setting Security Headers (CSP, HSTS, CORS, etc.)
1export function middleware(req: NextRequest) {
2	const res = NextResponse.next();
3	// Content Security Policy
4	res.headers.set(
5		"Content-Security-Policy",
6		"default-src 'self'; script-src 'self' https://trustedscripts.example.com"
7	);
8	// Strict Transport Security (HSTS)
9	res.headers.set("Strict-Transport-Security", "max-age=63072000; includeSubDomains; preload");
10	// Cross-Origin Resource Sharing (CORS)
11	res.headers.set("Access-Control-Allow-Origin", "*");
12	res.headers.set("Access-Control-Allow-Methods", "GET, POST, OPTIONS");
13	res.headers.set("Access-Control-Allow-Headers", "Content-Type, Authorization");
14	// Prevent clickjacking
15	res.headers.set("X-Frame-Options", "DENY");
16	// Prevent MIME-sniffing
17	res.headers.set("X-Content-Type-Options", "nosniff");
18	return res;
19}
Common Security Headers in Middleware
| Header | Purpose | Example Value | Usage in Middleware |
|---|---|---|---|
| Content-Security-Policy (CSP) | Controls what resources (scripts, styles, images, etc.) the browser can load, preventing XSS attacks. | default-src 'self'; script-src 'self' https://cdn.example.com; object-src 'none' | res.headers.set("Content-Security-Policy", "default-src 'self'; script-src 'self' https://cdn.example.com; object-src 'none'") |
| Strict-Transport-Security (HSTS) | Forces browsers to use HTTPS only, preventing protocol downgrade attacks. | max-age=63072000; includeSubDomains; preload | res.headers.set("Strict-Transport-Security", "max-age=63072000; includeSubDomains; preload") |
| Access-Control-Allow-Origin (CORS) | Defines which origins can access resources, preventing unauthorized cross-origin requests. | * (allow all) or https://myapp.com (restrict) | res.headers.set("Access-Control-Allow-Origin", "https://myapp.com") |
| X-Frame-Options | Prevents your site from being loaded in an iframe, blocking clickjacking attacks. | DENY or SAMEORIGIN | res.headers.set("X-Frame-Options", "DENY") |
| X-Content-Type-Options | Prevents MIME type sniffing, ensuring files are only interpreted as their declared type. | nosniff | res.headers.set("X-Content-Type-Options", "nosniff") |
| Referrer-Policy | Controls how much referrer information (URL) is shared with requests. | strict-origin-when-cross-origin | res.headers.set("Referrer-Policy", "strict-origin-when-cross-origin") |
| Permissions-Policy (previously Feature-Policy) | Controls access to browser features like camera, microphone, geolocation. | geolocation=(), camera=(), microphone=() | res.headers.set("Permissions-Policy", "geolocation=(), camera=(), microphone=()") |
| Cache-Control | Defines caching behavior to improve performance and security. | public, max-age=31536000, immutable | res.headers.set("Cache-Control", "public, max-age=31536000, immutable") |
Example: Adding All Security Headers in Middleware
1import { NextResponse } from "next/server";
2import type { NextRequest } from "next/server";
3export function middleware(req: NextRequest) {
4	const res = NextResponse.next();
5	res.headers.set(
6		"Content-Security-Policy",
7		"default-src 'self'; script-src 'self' https://cdn.example.com; object-src 'none'"
8	);
9	res.headers.set("Strict-Transport-Security", "max-age=63072000; includeSubDomains; preload");
10	res.headers.set("Access-Control-Allow-Origin", "https://myapp.com");
11	res.headers.set("X-Frame-Options", "DENY");
12	res.headers.set("X-Content-Type-Options", "nosniff");
13	res.headers.set("Referrer-Policy", "strict-origin-when-cross-origin");
14	res.headers.set("Permissions-Policy", "geolocation=(), camera=(), microphone=()");
15	res.headers.set("Cache-Control", "public, max-age=31536000, immutable");
16	return res;
17Summary:Cookies & Headers in Middleware
In Next.js, Middleware is perfect for route protection because it allows you to inspect cookies, headers, or tokens and decide whether to allow, block, or redirect the request — making authentication and role-based access control (RBAC) one of the most powerful use cases for the Edge Runtime.
Authentication (checking login status)
You typically store a session token or JWT in cookies. Middleware checks for that token, and if it’s missing/invalid, it redirects the user to a login page.
1// middleware.ts
2import { NextResponse } from "next/server";
3import type { NextRequest } from "next/server";
4export function middleware(req: NextRequest) {
5	const token = req.cookies.get("token"); // session/JWT
6	if (!token) {
7		// Redirect to login if not authenticated
8		return NextResponse.redirect(new URL("/login", req.url));
9	}
10	// Allow request to continue
11	return NextResponse.next();
12}
13// Match protected routes only
14export const config = {
15	matcher: ["/dashboard/:path*", "/profile/:path*"],
16};1// middleware.ts
2import { NextResponse } from "next/server";
3import type { NextRequest } from "next/server";
4export function middleware(req: NextRequest) {
5 const token = req.cookies.get("token");
6 const role = req.cookies.get("role"); // e.g., "admin" or "user"
7 if (!token) {
8 return NextResponse.redirect(new URL("/login", req.url));
9 }
10 // Example RBAC: only admins can access /admin/*
11 if (req.nextUrl.pathname.startsWith("/admin") && role !== "admin") {
12 return NextResponse.redirect(new URL("/unauthorized", req.url));
13 }
14 return NextResponse.next();
15}
16export const config = {
17 matcher: ["/dashboard/:path*", "/admin/:path*"],
18};Benefits of Middleware-Based RBAC
In Next.js Middleware, you typically handle authentication using JWT tokens or session cookies. The process starts with reading the cookie or header from the incoming request (using req.cookies.get() or req.headers.get()). For JWTs, you decode and verify the signature to ensure the token is valid and not expired. For session cookies, you check whether the cookie exists and, if needed, validate it against your session store.
If the request is unauthenticated (missing, invalid, or expired token/session), the best practice is to:
This approach ensures your app remains secure, user-friendly, and scalable at the edge.
This is how you achieve this...
Handling JWTs and session cookies in Next.js middleware is all about early interception, lightweight validation, and smart redirection — all at the edge, before your app even starts rendering.
Step 1: Read the Cookie Middleware runs in the Edge Runtime, so you use request.cookies.get():
const token = request.cookies.get('auth-token')?.value;You can also use headers if your token is passed via Authorization, but cookies are more common for web apps.
Step 2: Decode or Verify the Token
You can decode the JWT to extract user info (like role or ID). But remember: Edge Runtime has limited support for Node libraries, so use lightweight or edge-compatible JWT parsers.
1import { jwtVerify } from 'jose'; // Edge-compatible
2const secret = new TextEncoder().encode(process.env.JWT_SECRET);
3const { payload } = await jwtVerify(token, secret);
Avoid using heavy libraries like jsonwebtoken unless you're sure they're edge-safe.
Step 3: Check Authentication & Role
Use the decoded payload to enforce access control:
1if (!payload || !payload.role) {
2	return NextResponse.redirect(new URL('/login', request.url));
3}
4
5if (request.nextUrl.pathname.startsWith('/admin') && payload.role !== 'admin') {
6	return NextResponse.redirect(new URL('/unauthorized', request.url));
7}Use NextResponse.redirect()
This sends a 302 redirect to the client:
return NextResponse.redirect(new URL('/login', request.url));
Preserve the Original Path
So users can return after login:
1const loginUrl = new URL('/login', request.url);
2loginUrl.searchParams.set('redirect', request.nextUrl.pathname);
3return NextResponse.redirect(loginUrl);
Scope Middleware with matcher
Only run middleware on protected routes:
1export const config = {
2	matcher: ['/dashboard/:path*', '/admin/:path*'],
3};
Avoid Redirect Loops
Make sure /login and /unauthorized are excluded from middleware logic.
Bonus: Modular Auth Middleware
Split logic into reusable functions:
1export async function verifyAuth(request: NextRequest) {
2	const token = request.cookies.get('auth-token')?.value;
3	if (!token) return false;
4	try {
5		const { payload } = await jwtVerify(token, secret);
6		return payload;
7	} catch {
8		return false;
9	}
10}
Then use it in your main middleware.ts:
1const user = await verifyAuth(request);
2if (!user) return redirectToLogin(request);
Summary: Handling JWTs & Session Cookies in Middleware
What Is Localization?
Localization is the process of adapting your application’s content, layout, and behavior to match the language, region, and cultural preferences of the user. It’s not just translation.
It includes:
How Middleware Helps with Localization in Next.js?
Middleware runs before routing, which makes it perfect for detecting and handling localization logic early in the request lifecycle.
Common Use Cases:
Example: Locale Detection & Redirect
1import { NextResponse } from 'next/server';
2import type { NextRequest } from 'next/server';
3
4export function middleware(request: NextRequest) {
5    const pathname = request.nextUrl.pathname;
6
7    // Skip static files and API routes
8    if (pathname.startsWith('/api') || pathname.includes('.')) {
9        return NextResponse.next();
10    }
11
12    // Check if locale is already in the URL
13    const locales = ['en', 'hi', 'fr'];
14    const hasLocale = locales.some((locale) => pathname.startsWith(/${locale}));
15    if (hasLocale) return NextResponse.next();
16
17    // Detect locale from cookie or header
18    const cookieLocale = request.cookies.get('locale')?.value;
19    const headerLocale = request.headers.get('Accept-Language')?.split(',')[0].slice(0, 2);
20    const rawLocale = cookieLocale || headerLocale;
21    const detectedLocale = locales.includes(rawLocale || '') ? rawLocale : 'en';
22
23    // Redirect to locale-prefixed route
24    const normalizedPath = pathname === '/' ? '' : pathname;
25    return NextResponse.redirect(new URL(/${detectedLocale}${normalizedPath}, request.url));
26}
27
28export const config = {
29    matcher: ['/((?!api|_next|favicon.ico).*)'],
30};
Best Practices
In short:
Middleware makes localization seamless by detecting language preferences and redirecting users to the right localized route, ensuring a smoother global user experience.
What Is Geolocation-Based Routing?
In Next.js, Middleware can handle geolocation-based routing by using the request.geo object, which provides country, region, city, and latitude/longitude (only available on Vercel Edge). With this, you can decide which region-specific content or server to serve.
It’s the practice of detecting a user’s physical location (usually by IP) and then:
How Middleware Enables This in Next.js?
In Next.js Middleware, geolocation-based routing works by detecting the user’s location (usually through request headers like x-vercel-ip-country, x-vercel-ip-city, etc., automatically provided when deploying on Vercel Edge). Based on that information, you can decide which version of your site or content to serve.
Example: Redirect Based on Country
1// middleware.ts
2import { NextResponse } from "next/server";
3import type { NextRequest } from "next/server";
4
5const supportedRegions = new Set(['in', 'us', 'uk']);
6const fallbackRegion = 'us';
7
8export function middleware(request: NextRequest) {
9const { pathname } = request.nextUrl;
10
11// Skip static files and API routes
12if (pathname.startsWith('/api') || pathname.includes('.')) {
13	return NextResponse.next();
14}
15
16// Check if region is already in the path
17const hasRegion = Array.from(supportedRegions).some(region =>
18	pathname.startsWith('/${region}')
19);
20if (hasRegion) return NextResponse.next();
21
22// Get region from geo or fallback
23let region = request.geo?.country?.toLowerCase() || fallbackRegion;
24
25// Validate region
26if (!supportedRegions.has(region)) {
27	region = fallbackRegion;
28}
29
30// Rewrite to region-prefixed path
31const newPath = pathname === '/' ? /${region} : /${region}/${pathname};
32	return NextResponse.rewrite(new URL(newPath, request.url));
33}
34
35export const config = {
36	matcher: ['/((?!api|_next|favicon.ico).*)'],
37};Common Use Cases
Best Practices
What is the difference between localization and geolocation-based routing. They sound similar but they are different?
Localization
What it is: Adats content to the user's language, culture, or preference, regardless of the physical location.
Use Case: Serve content in the right language or format.
Example:
Focus: Language and cultural context.
Geo-location-based routing
What it is: Detects a user's physical location (usually via IP - country/region).
Use case: Serve content or redirect based on where the user is.
Example:
Focus: physical location of the user.
Key Difference:
What is A/B Testing?
Middleware in Next.js runs before the response is sent, making it ideal for experiments like A/B testing or feature flag rollouts. You can decide dynamically which version of a page a user should see — all at the edge, without slowing down requests.
A/B testing is a method of comparing two versions of something — version A and version B — to see which one performs better. It's like running a controlled experiment on your users.
Goal:
To make data-driven decisions by testing changes on a small group before rolling them out to everyone.
How A/B Testing or feature flags Works in Next.js Middleware?
Split Your Audience
Use middleware to randomly assign users to one of two groups:
You can do this by checking for a cookie and assigning one if it doesn’t exist:
1export function middleware(req: NextRequest) {
2	const experiment = req.cookies.get('ab-test')?.value
3	if (!experiment) {
4		const group = Math.random() < 0.5 ? 'A' : 'B'
5		const res = NextResponse.next()
6		res.cookies.set('ab-test', group, { path: '/', maxAge: 60 * 60 * 24 }) // 24 hours (86400 seconds)
7		return res
8	}
9	return NextResponse.next()
10}
This ensures each user is consistently assigned to the same group across visits.
Serve Different VersionsUse NextResponse.rewrite() to serve different content based on the assigned group without changing the visible URL:
1if (experiment === 'B' && req.nextUrl.pathname === '/homepage') {
2	return NextResponse.rewrite(new URL('/homepage-variant', req.url))
3}
This keeps the user on /homepage but serves /homepage-variant behind the scenes.
Use Feature Flags (Optional)
You can also integrate feature flags to toggle specific components or behaviors based on:
Flags can come from:
Measure Performance
Track key metrics to evaluate which version performs better:
Use analytics tools or custom logging to capture this data per group.
Analyze and Decide
Once enough data is collected:
Feature Flags with Middleware
Feature flags let you toggle features on or off for specific users, regions, or sessions — ideal for gradual rollouts or testing new functionality.
Use Cases:
Implementation Ideas:
Best Practices
What is Rate Limiting?
Rate limiting is a security and performance technique used to prevent abuse, spam, or denial-of-service by restricting the number of requests a client can make in a given timeframe. Middleware in Next.js is well-suited for this because it runs before the request hits your application logic, allowing you to block or throttle bad actors at the edge.
Think of it like a traffic signal:
If too many cars (requests) come at once, the signal controls the flow.
Without it, there’s a traffic jam (server overload) or accidents (abuse, spam, DDoS attacks).
How it Works in Middleware
Enforce limits
If a client exceeds the allowed requests (e.g., 100 requests/min), respond with 429 Too Many Requests.
Otherwise, allow the request to continue.
Return helpful headers
Add rate-limit headers (X-RateLimit-Limit, X-RateLimit-Remaining, Retry-After) so clients know their limits.
Real-World Example
Best Practices for Rate Limiting in Middleware
Use different limits for different endpoints
Example: Stricter limits on /login, more relaxed on /search, and almost no limits on static assets like images.
Graceful degradation, not hard blocking
Instead of instantly blocking, you can slow down responses (e.g., introduce small delays for suspicious clients).
Whitelist trusted sources
Internal APIs, monitoring services, or payment gateways may need exemptions.
Use sliding windows instead of fixed windows
Prevents "burst attacks" where attackers send requests at the boundary of time windows.
Leverage edge networks
Run rate limiting at the edge (CDN / Middleware) so abuse never reaches your origin server.
Monitor and log violations
Store logs of blocked requests for later analysis (IP reputation, fraud detection, auditing).
Return consistent error responses
Always respond with proper 429 Too Many Requests and meaningful retry info in headers.
Avoid over-restricting legitimate users
Mobile networks often share IPs → don’t lock out an entire region because one IP misbehaves.
Scale limits with traffic
On Black Friday, product launches, or viral content, adjust limits dynamically instead of hardcoding.
Make limits transparent to developers
If you’re offering an API, document the rate limits clearly so clients know how to design around them.
What is IP Blocking?
IP blocking is a security technique that prevents specific clients (based on their IP address) from accessing your application. It’s commonly used to stop malicious actors, spammers, scrapers, or region-specific traffic.
Middleware in Next.js is perfect for this because it runs before the request hits your application logic, meaning you can deny bad traffic right at the edge without wasting server resources.
It means rejecting requests from specific IP addresses or ranges before they reach your app. It is a powerful way to prevent access from unwanted sources — whether you're defending against spam, abuse, or region-specific restrictions.
Think of it like a security guard at the gate:
If the visitor (IP) is on the blacklist, they’re denied entry.
If they’re trusted, they’re let in without disturbing the building inside.
How It Works in Middleware
Identify the client’s IP
Check against a blocklist or allowlist
Decide the response
Example
1import { NextResponse } from 'next/server';
2import type { NextRequest } from 'next/server';
3
4// List of blocked IPs (can be expanded or loaded from external source)
5const blockedIPs = new Set([
6	'192.168.1.10',
7	'203.0.113.42',
8	'::ffff:127.0.0.1', // IPv6-mapped IPv4
9]);
10
11export function middleware(request: NextRequest) {
12	const ip =
13	request.ip || // Vercel Edge
14	request.headers.get('x-forwarded-for')?.split(',')[0]?.trim(); // Fallback
15
16	if (ip && blockedIPs.has(ip)) {
17		return new Response('Access Denied: Your IP is blocked', { status: 403 });
18	}
19
20	return NextResponse.next();
21}
22
23export const config = {
24	matcher: ['/((?!api|_next|favicon.ico).*)'],
25};
Real-World Use Cases of IP Blocking in Middleware
Best Practices for IP Blocking in Middleware
Maintain separate allowlist and blocklist
Always prioritize allowlist (trusted IPs) over blocklist checks.
Avoid hardcoding large lists in code
Store blocklists in Redis, Vercel KV, or external API → update without redeploys.
Use CIDR ranges when needed
Block entire ranges for abusive networks (e.g., 192.168.0.0/24).
Combine with rate limiting
If an IP violates rate limits repeatedly, auto-add to blocklist.
Return clear error codes
Use 403 Forbidden or 451 Unavailable for Legal Reasons for geo-blocks.
Be careful with shared IPs
Mobile carriers or corporate networks share IPs → blocking them may affect legitimate users.
Log all blocked requests
Helps with incident analysis, security audits, and adjusting policies.
Dynamic expiration
Auto-expire blocked IPs after some time to avoid permanent bans on possibly innocent users.
Notes
What is the difference between Rate Limiting and IP blocking.
Rate Limiting
What it is: Restricts how many requests a user/IP/client can make in a certain time window.
Goal: Prevent abuse (e.g., API spam, brute force attacks) without blocking legitimate traffic.
Example:
Behavior: Temporary once the time window resets, requests are allowed again.
IP Blocking
What it is: Completely denies all requests from a specific IP (or range of IPs).
Goal: Block known attackers, malicious bots, or unwanted traffic.
Example:
Behavior: Permanent (until unblocked).
Key Difference
Logging must be done carefully — otherwise, you risk adding latency. The secret is fire-and-forget logging: capture → dispatch → move on.
Key Principles
Capture Only Lightweight Metadata
Log essentials only:
Avoid heavy operations like DB queries, API calls, or file writes.
Asynchronous / Fire-and-Forget Logging
Use a non-blocking approach: send logs but don’t wait for the response.
Example:
1import { NextResponse } from 'next/server';
2import type { NextRequest } from 'next/server';
3import { sendLog } from './lib/logger'; // Async logging utility
4
5export function middleware(request: NextRequest) {
6	// Collect minimal request metadata
7	const logData = {
8		ip: request.ip,
9		path: request.nextUrl.pathname,
10		method: request.method,
11		timestamp: Date.now(),
12		userAgent: request.headers.get('user-agent'),
13	};
14
15	// Fire-and-forget: don’t await
16	sendLog(logData);
17	return NextResponse.next();
18}
Where sendLog() might:
Offload Work to External Pipelines
Use Batching or Buffering (Advanced)
For high-volume traffic, buffer logs and flush periodically.
Reduces network overhead and improves throughput.
Sanitize Sensitive Data
Never log raw:
Apply redaction/masking before dispatching.
Leverage Edge-Native Logging Solutions
Best Practice Summary
Running Middleware at the edge in Next.js means your code executes globally, close to users, giving ultra-low latency and fast request handling. However, you trade away the full power of Node.js for a lighter, faster, restricted environment.
In other words........
Running Middleware at the edge in Next.js means executing request-handling logic on globally distributed servers — called Edge Locations or Points of Presence (PoPs) — that are physically closer to the user. This is a major shift from traditional server-side middleware, which runs in centralized data centers or serverless functions.
What Is Edge Middleware?
Edge Middleware in Next.js:
Use Cases:
What Is Server-Side Middleware?
Server-side middleware:
Difference from Server-side Middleware
Location:
Latency:
Environment:
Startup:
Key Differences
| Feature | Edge Middleware | Server-Side Middleware |
|---|---|---|
| Location | Runs on edge servers near the user | Runs on centralized server or serverless |
| Latency | Ultra-low (milliseconds) | Higher (depends on server location) |
| Cold Starts | Practically eliminated | Can be 200–300ms in serverless setups |
| Runtime Environment | Restricted (no Node.js APIs) | Full Node.js access |
| Request Body Access | Not available | Available |
| Best For | Routing, personalization, security | Data processing, business logic |
Running Middleware closer to users — specifically at the edge — unlocks a suite of performance benefits that can dramatically improve responsiveness, scalability, and user experience
Performance Benefits of Edge Middleware
Lower Latency (Faster Responses)
Faster Redirects and Rewrites
URL-based logic (auth gating, A/B testing, geo-routing) executes immediately at the edge, often before the request even reaches your app.
Improved Scalability
Reduced Cold Start Penalties
Better User Experience Globally
Optimized Caching Integration
In simple words
Edge Middleware is like a smart traffic cop stationed at every intersection — fast, local, and decisive. It enables personalization, security, and routing logic to happen before your app even starts rendering, all while keeping latency low and scalability high.
At the end
Edge Middleware gives you speed, scalability, and consistency worldwide by moving lightweight request handling closer to users instead of a single origin server.
Edge Runtime vs Node.js Runtime: Trade-Offs
| Feature | Edge Runtime | Node.js Runtime |
|---|---|---|
| Startup Time | Near-instant (cold starts <50ms) | Slower (cold starts ~200–300ms) |
| Latency | Ultra-low (runs close to user) | Higher (centralized or regional servers) |
| Execution Environment | Lightweight isolates (Web API subset) | Full Node.js environment |
| API Access | Limited (no fs, net, crypto) | Full access to Node.js APIs |
| Request Body Access | Not available | Available |
| Package Support | Smaller subset of npm packages | Full npm ecosystem |
| Code Size Limit | ~1–4MB (platform-dependent) | ~50MB (serverless functions) |
| Caching Behavior | Runs before CDN cache | Runs after cache (if applicable) |
| Best For | Routing, personalization, security headers | Data processing, DB access, file I/O |
| Scalability | Auto-scales globally | Scales per region or serverless instance |
Architectural Implications
Edge Runtime Strengths:
Edge Runtime Limitations:
Node.js Runtime Strengths:
Node.js Runtime Limitations:
When to Use Each
Use Edge Runtime for:
Use Node.js Runtime for:
Practical Guideline
In Next.js on Vercel, Middleware at the edge plays a pivotal role in how requests interact with CDN caching — it does so by modifying requests and responses to enable fast, personalized, and scalable apps.
How .... ??
Runs before the cache
Can customize caching behavior
Middleware can modify request/response headers (Cache-Control, Vary, etc.).
Example: you could serve different cached versions of a page per country, language, or A/B test group.
This enables personalized caching instead of one-size-fits-all.
Global Distribution Benefits
Because Middleware runs on Vercel’s Edge Network (CDN PoPs), caching rules are enforced closer to users.
This reduces latency and makes personalized caching scalable.
Potential Performance Trade-Offs
Use Cases for Cache + Middleware Together
Best Practices
In short:
Summary
Edge Middleware in Next.js has strict limitations compared to running in a full Node.js server.
Code Size Limitations
Bundle size is small → Edge functions (including Middleware) are designed to load super fast in V8 isolates.
You should stick to lightweight utilities, avoid large dependencies, and prefer native Web APIs.
Runtime Environment
No full Node.js runtime → It’s not Node.js; it’s more like a browser-like V8 isolate.
Performance Implications
Best Practices to Avoid Bottlenecks
In short:
Edge Middleware must be lightweight, stateless, and fast, otherwise you’ll run into limits or slow down every request.
Local Testing in Next.js Dev Mode
When you run next dev, Middleware does run locally, but by default it executes in the Node.js runtime, not the Edge Runtime.
This means you can test logic like request inspection, rewrites, and redirects — but the behavior won’t be 100% identical to production.
For example, Node APIs may appear available locally, but they will break in production because Edge Middleware runs in a restricted environment (no native Node APIs).
Using vercel dev for Closer Simulation
Running vercel dev gives you a closer approximation of the Edge Runtime, because it tries to mimic Vercel’s production environment.
Still, it’s not a full isolate-based simulation — but it’s better than plain next dev if you want to catch runtime differences earlier.
Simulating Edge Runtime via Wrangler (Advanced)
Since Vercel Edge Runtime is based on Web Standard APIs (like Cloudflare Workers, Deno), you can simulate the environment with tools like:
These let you test under restrictions similar to the Edge Runtime (no fs, limited crypto, etc.), helping you catch incompatibilities.
Best Practices for Testing Middleware
In short:
You can test Middleware locally with next dev, but it’s Node-based. vercel dev is closer but not perfect. For true simulation, use standards-based environments (Wrangler/Miniflare). Ultimately, nothing beats testing on Vercel Edge itself, so deploy early and often.
Edge Middleware runs before your app and CDN caching, so if it fails, it can break the entire request flow. To keep apps reliable and fast, error handling needs to be fail-safe, lightweight, and production-ready.
Fail Fast, Fail Gracefully
Middleware should be lightweight — no heavy DB queries or blocking operations.
If something goes wrong, don’t crash the pipeline. Instead, return a safe fallback:
1import { NextResponse } from "next/server";
2
3export function middleware(req: Request) {
4	try {
5		if (!req.headers.get("authorization")) {
6			return NextResponse.redirect(new URL("/login", req.url));
7		}
8		return NextResponse.next();
9	} catch (err) {
10		console.error("Middleware error:", err);
11		return NextResponse.redirect(new URL("/500", req.url));
12	}
13}
Use Try-Catch Strategically
1export function middleware(request: NextRequest) {
2	try {
3		const token = request.cookies.get("auth-token")?.value;
4		// verify token here
5	} catch (error) {
6		console.error("Auth check failed:", error);
7		return new Response("Unauthorized", { status: 401 });
8	}
9	return NextResponse.next();
10}
Return Meaningful Status Codes
Clear codes help clients and downstream systems handle errors properly.
Logging & Monitoring
Always send logs asynchronously (“fire-and-forget”) so they don’t block responses.
1sendErrorLog({
2	message: error.message,
3	path: request.nextUrl.pathname,
4	ip: request.ip,
5});
Handle Async Failures Properly
1export async function middleware(req: Request) {
2	try {
3		const res = await fetch("https://api.example.com/feature-flags");
4		if (!res.ok) throw new Error("Failed to fetch flags");
5		return NextResponse.next();
6	} catch (err) {
7		console.error("Edge fetch failed:", err);
8		return NextResponse.next(); // fallback to default behavior
9	}
10}
Avoid Breaking the CDN
Graceful Fallbacks
Always check for optional runtime data (like request.geo) and default safely:
1const country = request.geo?.country?.toLowerCase() || "us";Don’t Rely on Node.js Error Objects
Test Error Scenarios in Staging
Don’t just test the happy path. Simulate:
Summary
Error handling in Edge Middleware is about resilience without overengineering.
If Middleware fails, users should still see something useful — not a blank page.
Debugging async operations inside Next.js Middleware — especially within the Edge Runtime — requires a different mindset than traditional Node.js debugging. Since the Edge Runtime is lightweight, stateless, and restricted, you need to lean on non-blocking techniques, external observability, and smart instrumentation.
Key Constraints of Edge Middleware
Use Console Logging Wisely Since you don’t have Node.js debugging tools, console.log, console.error, and console.time are your main allies. Logs from Middleware show up in Vercel Edge Logs in production.
Example:
1export async function middleware(req: Request) {
2	console.time("feature-flags");
3	try {
4		const res = await fetch("https://api.example.com/feature-flags");
5		console.log("Fetch status:", res.status); const data = await res.json();
6		console.log("Feature flags:", data); return NextResponse.next();
7	} catch (err) {
8		console.error("Middleware async error:", err);
9		return NextResponse.next();
10	} finally {
11		console.timeEnd("feature-flags");
12	}
13}
Use Try-Catch Around Async Calls Always wrap await fetch() or token validation in try/catch. Edge errors won’t propagate to the browser — so logging and safe fallbacks are critical.
Example:
1try {
2	const response = await fetch(apiUrl, { cache: "no-store" });
3	if (!response.ok) throw new Error("API request failed");
4} catch (err) {
5	console.error("Async operation failed:", err);
6	return NextResponse.next(); // fallback
7}
Fire-and-Forget Error Reporting If you need structured debugging beyond logs, send errors to an Edge-compatible logging service (Sentry Edge SDK, Logtail, Upstash Kafka). Do not await these calls — it will slow down your Middleware.
Example:
1// fire-and-forget
2
3sendErrorReport({
4	message: err.message,
5	url: req.url,
6	time: Date.now(),
7});
Use event.waitUntil() for Fire-and-Forget Logging
This lets you run async operations without delaying the response — ideal for logging, analytics, or background tasks.
1export function middleware(req: NextRequest, event: NextFetchEvent) {
2	event.waitUntil(
3		fetch('https://my-logging-service.com', {
4			method: 'POST',
5			body: JSON.stringify({ path: req.nextUrl.pathname }),
6		})
7	);
8
9	return NextResponse.next();
10}
This is the Edge Runtime’s version of “background tasks” — it won’t block the response.
Use External Logging Services
Since you can’t write to disk or inspect stack traces, push logs to:
These services let you inspect logs across regions and timeframes.
Debug With Staging Environments
Summary table
| Aspect | Key Points | Example / Tools |
|---|---|---|
| Constraints of Edge Runtime | No Node.js APIs (fs, process, etc.) - No synchronous I/O - No request body access - Limited debugging (no breakpoints/stack traces) - Only Web APIs available | fetch, console, TextEncoder |
| Console Logging | Use console.log, console.error, console.time to trace async operations | Logs appear in Vercel Edge Logs |
| Error Handling | Wrap async calls (await fetch) in try/catch Log errors and provide safe fallbacks | ts try { await fetch(...) } catch(err) { console.error(err); return NextResponse.next(); } |
| Fire-and-Forget Error Reporting | Send errors to external logging/monitoring services without blocking Middleware | sendErrorReport({ message, url, time }) |
| Background Tasks with event.waitUntil() | Run async tasks in background without delaying response | ts event.waitUntil(fetch("https://my-logging.com", {...})) |
| External Logging Services | Push logs/events to third-party services for deeper debugging | Sentry, Logtail, Upstash Kafka, Datadog |
| Debugging Strategy | Use staging environments to simulate downtime, slow APIs, token errors | Deploy staging project on Vercel |
Middleware in Next.js (especially under the Edge Runtime) is powerful but very easy to misuse. Here’s a breakdown of the most common mistakes developers make and how to avoid them
Common Middleware Mistakes in Next.js & How to Avoid Them
Using Middleware for Heavy Computation
Mistake:
Performing expensive tasks like image processing, database queries, or large data fetching inside Middleware.
Why it’s bad:
Middleware executes on every request at the edge, before CDN caching. Heavy work increases latency globally.
Fix:
Keep Middleware lean — offload heavy tasks to API routes, server components, or background jobs.
Accessing the Request Body
Mistake:
Trying to read JSON or form data in Middleware.
Why it’s bad:
The Edge Runtime doesn’t allow request body access (req.body is unavailable).
Fix:
Use query params, cookies, or headers for Middleware logic. Parse the body later in API routes.
Calling External APIs Directly (Improperly)
Mistake:
Awaiting external API calls inside Middleware.
Why it’s bad:
Adds latency, blocks the edge runtime, and can fail silently.
Fix:
Skipping Fallbacks (Geo, Cookies, API Failures)
Mistake:
Assuming request.geo, cookies, or API calls always succeed.
Why it’s bad: These
values can be undefined (e.g., in local dev or unsupported regions). API downtime may break all requests.
Fix:
Always provide a safe fallback, e.g.:
Not Validating Redirects / Rewrites
Mistake:
Redirecting without checking conditions.
Why it’s bad:
Causes infinite loops or unnecessary hops.
Fix:
Add guards:
if (pathname.startsWith(/${locale})) return NextResponse.next();
Overloading Middleware with Multiple Concerns
Mistake:
Mixing authentication, geo-routing, logging, and feature flags into one big file.
Why it’s bad:
Harder to maintain, debug, and optimize.
Fix:
Split logic into small utilities and import them into middleware.ts. Keep Middleware modular and focused.
Ignoring CDN & Caching Behavior
Mistake:
Adding logic that runs for every request, even cached ones.
Why it’s bad:
Breaks caching, increasing latency unnecessarily.
Fix:
Be caching-aware — only use Middleware when personalization or dynamic routing is truly required.
Using Unsupported Node.js APIs
Mistake:
Importing Node-only modules like fs, process, or crypto.
Why it’s bad:
The Edge Runtime only supports Web APIs — Node APIs will crash.
Fix:
Use edge-compatible alternatives like:
Forgetting Regional Consistency
Mistake:
Relying on local state in Middleware (e.g., writing to memory or expecting region-specific data).
Why it’s bad:
Middleware runs globally in multiple regions — state won’t sync.
Fix:
Use global stores like Vercel KV, Redis, or Upstash for consistent data across regions.
Debugging Only in Production
Mistake:
Skipping proper staging tests, relying on real users to reveal bugs.
Why it’s bad:
Bugs in Edge Middleware are harder to trace and may harm real users.
Fix:
Always test in staging with Vercel Edge Logs or external logging (Sentry, Logtail, Datadog). Simulate failures (invalid tokens, API downtime).
Summary Table — Middleware Mistakes
| Mistake | Why It’s a Problem | How to Avoid It |
|---|---|---|
| Heavy computation inside Middleware | Slows every request globally | Offload to APIs/server functions; keep Middleware lean |
| Accessing request body | req.body not available in Edge | Use headers, cookies, or parse body later in API routes |
| Awaiting external API calls | Adds latency, blocks runtime | Use event.waitUntil() for non-critical tasks; move critical fetches server-side |
| Skipping fallbacks (geo, cookies, APIs) | Undefined values or downtime break requests | Always provide safe defaults or use NextResponse.next() |
| Misconfigured redirects/rewrites | Infinite loops, unnecessary hops | Add guards to prevent redundant redirects |
| Overloading Middleware with too many concerns | Hard to maintain and debug | Keep Middleware modular and focused |
| Ignoring CDN caching | Runs logic on cached requests | Only apply Middleware where dynamic logic is needed |
| Using Node.js APIs (fs, process) | Not supported in Edge Runtime | Use Web APIs (fetch, crypto.subtle, TextEncoder) |
| Forgetting regional consistency | Middleware runs globally → inconsistent state | Use global stores (KV, Redis, Upstash) |
| Debugging only in production | Hard to trace, real users impacted | Test in staging with Vercel Edge Logs or observability tools |
In Next.js, Middleware provides fast, edge-side filtering and shaping, while API routes handle deeper validation and business logic. Together, they enable secure and performant request pipelines.
Use Middleware for Early Filtering (Edge Gatekeeping)
Middleware runs before routing and CDN caching, making it ideal for lightweight filtering:
1// middleware.ts
2import { NextResponse } from "next/server";
3import type { NextRequest } from "next/server";
4export function middleware(request: NextRequest) {
5	const token = request.cookies.get("auth-token")?.value;
6	if (!token) {
7		return NextResponse.redirect(new URL("/login", request.url));
8	}
9	return NextResponse.next();
10}
Benefit: Invalid or unauthenticated requests are stopped early, saving compute and avoiding unnecessary API route execution.
Use API Routes for Deep Validation & Business Logic
Once Middleware passes the request through, API routes handle the heavier work:
1// /pages/api/profile.ts
2import { verifyToken } from "@/lib/auth";
3
4export default async function handler(req, res) {
5	try {
6		const token = req.cookies["auth-token"];
7		const user = await verifyToken(token);
8		if (!user) {
9			return res.status(401).json({ error: "Unauthorized" });
10		}
11		res.status(200).json({ user });
12	} catch (err) {
13		res.status(500).json({ error: "Internal Server Error" });
14	}
15}
Benefit: Heavy or sensitive operations (DB, token decoding, RBAC) stay server-side, not at the edge.
Preprocessing with Metadata Injection Middleware can enrich requests before they hit API routes — useful for adding geo, feature flags, or request IDs.
1// middleware.ts
2import { NextResponse } from "next/server";
3import type { NextRequest } from "next/server";
4
5export function middleware(req: NextRequest) {
6	const country = req.geo?.country || "unknown";
7	const requestHeaders = new Headers(req.headers);
8	requestHeaders.set("x-country", country);
9
10	return NextResponse.next({ request: { headers: requestHeaders }, });
11}1// /pages/api/hello.ts
2export default function handler(req, res) {
3 const country = req.headers["x-country"];
4 res.status(200).json({ message: Hello from ${country} });
5}Benefit: API routes don’t need to repeatedly resolve geo/flags — Middleware sets it once globally.
Reusable Middleware Wrappers for API Routes
For consistency, wrap API routes with reusable middleware-style helpers (like apiHandler) to centralize validation, error handling, and preprocessing.
1// /lib/api-handler.ts
2export function apiHandler(handler) {
3	return async (req, res) => {
4		try {
5			await jwtMiddleware(req, res);
6			// custom auth check
7			await handler(req, res);
8		} catch (err) {
9			errorHandler(err, res); // central error handling
10		}
11	};
12}1// /pages/api/data.ts
2import { apiHandler } from "@/lib/api-handler";
3async function getData(req, res) {
4 const data = await fetchDataFromDB();
5 res.status(200).json(data);
6}
7
8export default apiHandler(getData);Benefit: Reduces boilerplate — every API route automatically enforces the same policies.
Logging & Monitoring Across Both Layers
1// middleware.ts
2export function middleware(req: NextRequest, event: NextFetchEvent) {
3	event.waitUntil( fetch("https://my-logging-service.com", {
4		method: "POST", body: JSON.stringify({ path: req.nextUrl.pathname }),
5		})
6	);
7	return NextResponse.next();
8}
Benefit: Unified logging — lightweight logs at the edge + detailed backend tracing.
Final Takeaway
Middleware = fast, edge-side filter for validation, shaping, and early rejection.
API Routes = heavy-duty backend for DB access, RBAC, and sensitive logic.
Together → a secure, efficient, and maintainable request flow.
Use Middleware when you need edge performance, API routes when you need backend power, and combine both when requests require early filtering + deep processing.
Chaining multiple Middleware functions can get messy fast — especially with auth, geo-routing, logging, headers, and feature flags. The key is to modularize each concern and use a pipeline (stack/chain) pattern to compose them in order.
Use Middleware Factories (Higher-Order Functions)
Factories wrap and extend Middleware, returning a new one. This allows clean composition (like functional pipes).
1// types.ts
2import { NextMiddleware } from "next/server";
3export type MiddlewareFactory = (next: NextMiddleware) => NextMiddleware;
Create Modular Middleware Units
Keep each Middleware focused on a single task:
1// withAuth.ts
2import { NextResponse } from "next/server";
3import type { NextMiddleware } from "next/server";
4
5export const withAuth: MiddlewareFactory = (next) => (req) => {
6	const token = req.cookies.get("auth-token")?.value;
7	if (!token) {
8		return NextResponse.redirect(new URL("/login", req.url));
9	}
10	return next(req);
11};1// withGeoRedirect.ts
2import { NextResponse } from "next/server";
3
4export const withGeoRedirect: MiddlewareFactory = (next) => (req) => {
5 const country = req.geo?.country?.toLowerCase();
6 if (country === "in") {
7 return NextResponse.redirect(new URL("/in", req.url));
8 }
9 return next(req);
10};Compose with a stackMiddleware
The stack approach is functional and elegant:
1// stackMiddleware.ts
2import type { NextMiddleware } from "next/server";
3import { MiddlewareFactory } from "./types";
4
5export function stackMiddleware(middlewares: MiddlewareFactory[]): NextMiddleware {
6	return middlewares.reduceRight(
7		(next, middleware) => middleware(next),
8		(req) => new Response(null, { status: 200 }) // fallback
9	);
10}
Alternatively, for simplicity, you can use an imperative chain:
1// chain.ts
2import { NextResponse } from "next/server";
3import type { NextRequest } from "next/server";
4
5export type MiddlewareFn = (req: NextRequest) => NextResponse | void;
6
7export function chain(...fns: MiddlewareFn[]) {
8	return (req: NextRequest) => {
9		for (const fn of fns) {
10			const result = fn(req);
11			if (result) return result; // early exit
12		}
13	return NextResponse.next();
14	};
15}Apply the Stack in middleware.ts
Keep your entry Middleware declarative and clean:
1// middleware.ts
2import { stackMiddleware } from "./middlewares/stackMiddleware";
3import { withAuth } from "./middlewares/withAuth";
4import { withGeoRedirect } from "./middlewares/withGeoRedirect";
5import { withLogging } from "./middlewares/withLogging";
6
7export const middleware = stackMiddleware([
8	withLogging,
9	withGeoRedirect,
10	withAuth,
11]);
12
13export const config = {
14	matcher: ["/((?!api|_next|favicon.ico).*)"], // scope it
15};Final Summary
To make Middleware reusable across multiple Next.js projects or teams, you need to treat it like a modular, versioned, and well-documented package — just like any other shared utility or SDK.
Modularize Middleware into Small Units
Each Middleware should do one thing only (auth check, geo-redirect, logging, header injection).
Keep them stateless and predictable, so they can run in any project without unexpected side effects.
1// middlewares/withAuth.ts
2import { NextResponse } from "next/server";
3import type { NextRequest } from "next/server";
4
5export function withAuth(next: (req: NextRequest) => NextResponse) {
6	return (req: NextRequest) => {
7		const token = req.cookies.get("auth-token")?.value;
8		if (!token) {
9			return NextResponse.redirect(new URL("/login", req.url));
10		}
11		return next(req);
12	};
13}
Use a Middleware Composer
Instead of stuffing all logic in one file, build a composition utility.
This makes your Middleware plug-and-play across projects.
1// middlewares/compose.ts
2import type { NextRequest } from "next/server";
3import { NextResponse } from "next/server";
4
5export type MiddlewareFn = (req: NextRequest) => NextResponse | void; export functioncompose(...fns: MiddlewareFn[]) {
6	return (req: NextRequest) => {
7		for (const fn of fns) {
8			const result = fn(req);
9			if (result) return result; // stop early if response is returned
10		}
11		return NextResponse.next();
12	};
13}
Package Middleware as Internal Libraries
If you have multiple repos, move shared Middleware into: A private npm package (@company/middleware)
Or a git submodule/monorepo package (/packages/middleware)
This ensures one source of truth for auth, logging, etc.
Example monorepo structure apps/ project-a/ project-b/ packages/ middleware/ # shared Middleware package withAuth.ts withGeo.ts compose.ts
Provide Configurable Middleware Factories
Middleware should accept options (e.g., allowed roles, redirect paths).
This makes them reusable across projects with different rules.
1// middlewares/withRole.ts
2export function withRole(roles: string[]) {
3	return (next) => (req) => {
4		const role = req.cookies.get("role")?.value;
5		if (!role || !roles.includes(role)) {
6			return NextResponse.redirect(new URL("/unauthorized", req.url));
7		}
8		return next(req);
9	};
10}
Document and Version Your Middleware
1// middleware.ts (in consuming project)
2import { compose } from "@company/middleware";
3import { withAuth, withRole } from "@company/middleware";
4
5export default compose( withAuth, withRole(["admin", "editor"]) );
6
7export const config = { matcher: ["/dashboard/:path*"], };
Benefits
Summary
After reading this guide, you’ll understand:
What Middleware Is & Why It Matters
Differences from SSR, API Routes, and Server Components
Configuration with Matchers
Authentication & Authorization
Cookies & Headers
Advanced Use Cases
Performance Implications at the Edge
Testing, Debugging & Error Handling
Chaining & Reusability
In short:
Middleware is your traffic cop at the edge — intercepting, shaping, and securing requests before they hit your app. Done right, it boosts performance, improves scalability, and simplifies complex request flows.
By the end, you’ll be able to confidently design fast, secure, and scalable request flows using Middleware in Next.js.